
home | topos &
beta | photos | trip
reports | links
RIVERSIDE QUARRY
Area Description
Located in an abandoned granite quarry, this west-facing 300 foot high wall
is the closest thing we in Southern California have to Yosemite's aid routes.
The pitches tend to be somewhat short, as there are many sharp flakes and
edges to climb around. There are also many expanding blocks and some loose
rock, part of the legacy left by the blasting done here years ago. Please
don't add or remove bolts from existing routes. However, new bomber 3/8"
belay bolts are ALWAYS welcome! Just make sure you know what you're doing.
CLIMB SAFE!
Directions
60 to Valley Way exit. South to Mission. Left on Mission for about a mile.
Left on Pacific. Go under fwy, cross railroad tracks. Pacific will make
a sharp right just past the tracks. Look for a dirt road on the left almost
immediately. Then wind your way past the 3rd World conditions until you
hit an open area with a blocked off entrance to your left (optional hike
in entrance). From this open area head north for about 100 yards, jog right
and then take the uphill road that continues north to the crag.
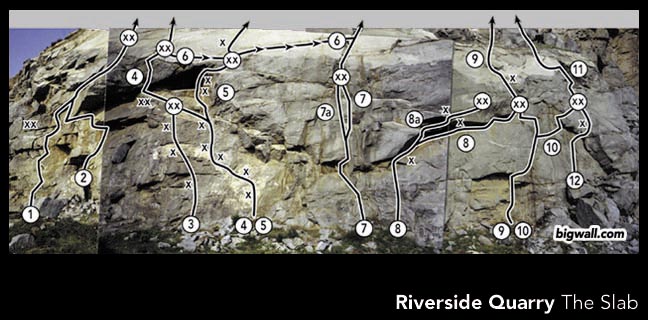
THE SLAB
Route Descriptions (beginning at far left of crag, and going left to
right)
1) UNEXPECTED DIFFICULTIES (5.11 PG or 5.9, A3)
- Obvious 5.9 hand/fist crack at far left edge of THE SLAB. Follow crack
through roof (5.11) to sling belay. Pitch 2 begins with 5.4 slab climbing
past a false belay to a 5.11 thin crack up the slab. Watch rope drag on
Pitch 2. Please don't use pins in fingerlocks.
- Pro: 4 RURPS, 3 KBs, 2 Bugs, 2 LAs (long), Gear to 3.5".
- 2) PUNISH THE PUPPY (5.9, A2)
- Step off large block to the right of large roof (or do the A4 direct
start). Climb 40 feet of A2, pass a roof on its left side, then traverse
left around a second roof. Thin A3 leads to the sling belay of UNEXPECTED
DIFFICULTIES. Finish on UD or traverse right via poorly protected 5.5 to
join FEETAL REARRANGEMENT.
- Pro: 4 KBs (mostly short), 3 Bugs, 4 LAs, Gear to 2.5".
- 3) BREEZE (5.9)
- Face climb past 3 bolts to 3 bolt anchor left of FEETAL REARRANGEMENT.
Rap or continue left to finish via FR.
Pro: Quickdraws.
- 4) FEETAL REARRANGEMENT (5.8 PG, A2)
- Climb face past 4 bolts to a bolt and fixed pin belay. Pitch 2 traverses
far left to the left side of a large alcove/cave. Awkward A2 climbing thru
the roof reaches the next belay. Pitch 3 is moderate A2 up thin crack to
a loose, unprotected 5.6 R bulge before the anchors on the rim.
- Pro: 2 KBs, 2 Bugs, 6 LAs (incl. long and thicks), 3 ea. 1/2"
- 5/8", Gear to 4".
- 5) PUCKER POWER (5.4, A3+)
- Climb Pitch 1 of FEETAL REARRANGEMENT. Pitch 2 angles out the right
side of the large alcove/cave via hard nailing (A3) and passing two bolts
to the belay ledge.Pitch 2 heads up and left to reach a right diagonalling
thin crack (A3+) which is followed to the rim.
- 6) THE FINE LINE (5.10+ PG or A3)
- This variation begins at the second belay for FEETAL REARRANGEMENT.
Traverse right following a very thin crack to a gear belay partway up VERTICAL
VEE's second pitch. Finish on VV. Please don't use pins in fingerlocks.
- Pro: RURPs, 8 KBs, 5 Bugs, Gear to 2.5".
- 7) VERTICAL VEE (5.8 PG, A3)
- Pitch 1 is poorly protected 5.7 R past some loose rock to an alcove
above a bad landing. Be careful, this pitch has already claimed one life.
From the alcove, follow a crack past a roof to reach a pair of ultra thin
V cracks. KBs take you straight up, or LAs if you decide to head right.
Both cracks deposit you on a slab. Follow the crack in the center of the
slab through a bulge (A1) to the belay in an obvious alcove. Pitch 2 begins
with 5.8 stemming out of the alcove to reach the easy crack and slab above.
Walkoff left via easy but grungy 5.2 climbing (Left Walkoff).
- Pro: 2 KBs, 2 Bugs, 3 LAs, Gear to 2.5"
- 7a) VERTICAL VEE A4 VAR:
- Instead of taking one of the thin V cracks, stay in the corner via
heads and hooks to the belay.
- 8) ROMP (5.8 PG, A2)
- Climb the face 25' right of VV to a bolt at the lip of the obvious
roof. Nail (A2) right along underside of roof to a short free romp into
the belay. Pitch 2 ascends the steep headwall to easier slab climbing. Belay
at the base of the upper wall. Left Walkoff: Traverse left via 3rd class
rock to join the 5.2 walkoff for VV and the other LEFT SLAB routes or Upper
Walkoff: Right and up 4th class direct to the rim.
- Pro: 8 Bugs, 2 ea. 1/2" to 3/4", Gear to 2".
- 8a) ROMP A3 VAR:
- At the beginning of the roof on Pitch 1 continue up to a secondary
roof instead of traversing right. Rap from anchors.
- 9) GULP SWALLOW (5.10+)
- Start beneath yellow face with roof, climb a crack past the roof to
an overhanging arch to a barndoor lieback. Once past the crux jog left on
easier moves to the belay of ROMP.
- Pro: Gear to 2.5".
- 10) SWALLOW RIGHT (5.10, A2)
- Climb GULP SWALLOW for 40 feet but continue right on the arching crack
(A2). At the end of the crack tackle a large block to an interesting 5.7
traverse onto the belay ledge. Top out via ONE FOR THE ROAD or Lower Walkoff,
4th class (down and right).
- Pro: 3 KBs, 2 Bugs, 2 LAs, 2 ea. 1/2", Gear to 4".
- 11) ONE FOR THE ROAD (5.7 PG)
- From belay ledge head up and left. Airy, weird and sometimes scary...sounds
fun eh? Exit via Upper Walkoff to rim.
- Pro: 5 pins (LA long, thin to 3/4"), Gear to 2".
- 12) ASS OVER TEACUPS (5.9 PG)
- Begin atop some large boulders at the extreme right of the THE SLAB.
Follow finger crack past a bolt to small roof. Work into the ramp to the
right via slopers (crux), then face climb past a second bolt to belay ledge.
Top out via ONE FOR THE ROAD or Lower Walkoff.
- Pro: 2 KBs, 2 Bugs, 1 ea. 1/2" and 3/4", Gear to 1.5".
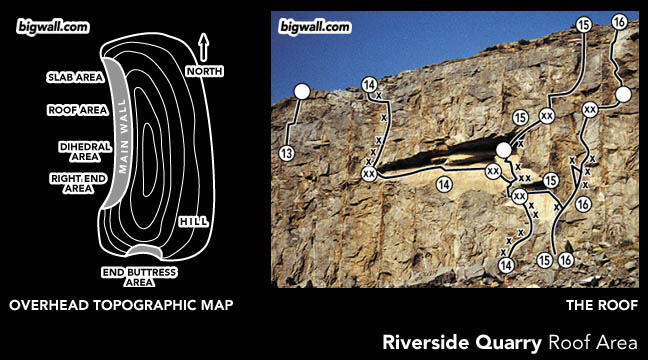
THE ROOF
Route Descriptions (going left to right)
13) HERCULES HAND CRACK (5.8)
- Overhung fist crack with good exposure up and to the left of The Roof.
Reach the climb's start by downclimbing and traversing in on a ledge from
the rim.
- Pro: Gear to 3.5".
- 14) PURSUIT OF PAIN (5.9 PG, A4)
- Begins under the rightmost side of the huge roof that gives the area
its name. Face climb past 3 bolts to finger crack with 4 fixed pins. A 5.9
mantle and 2 more bolts put you at the first sling belay. Pitch 2 traverses
left out a small roof (A2) to a short, overhung crack with a bathook (an
ex-dowel) to a ledge. From the ledge climb a 5.7 dihedral to the belay.
Pitch 3 is a 130' left traversing series of thin cracks (A4) to a belay
in an alcove. Pitch 4 is more difficult nailing, but bolt protected. Top
out via 5.6 stemming and mantles. NOTE: Pitch 2 contains a very sharp edge.
To avoid chopping your rope, clip the rope into the double bolts on STAY
OF EXECUTION.
- Pro: 8 RURPs, 10 KBs, 10 Bugs, 8 LAs, 2 ea. 1/2", 4 ea. 3/4",
RPs, heads, Gear to 2".
- 15) STAY OF EXECUTION (5.8 PG, A3)
- Obvious line to the right of the big roof. Climb vertical crack (A2)
to a bad bolt. A1 climbing leads left into an arch where a tension traverse
reaches the sling belay of PURSUIT OF PAIN. Pitch 2 follows PoP up to the
slab below a roof. Climb up (5.8) onto the upper slab passing 3 bolts (one
is doubled) to the second belay in a crack in the slab. Watch rope drag.
Pitch 3 tackles the dramatic line out the roof (A2) via the top crack to
an airy sling belay. Pitch 4 starts with 5.6 free climbing to a ledge overhead,
then hooks right into an A2 crack. From this crack's end, unprotected 5.5
climbing reaches the rim. Watch rope drag.
- Pro: 1 RURP, 2 KBs, 2 Bugs, 8 LAs, 4 ea. 1/2" to 3/4",
hooks including bathooks, Gear to 3".
- 16) FOWL PLAY (5.6, A3)
- Begin in the same crack as STAY OF EXECUTION but continue straight
up (A3) to a ledge. Pitch 2 traverses right (A2) for a very short pitch.
Pitch 3 begins with an easy free section, finishing via an easy, but double-overhung
corner to the rim.
- Pro: 1 RURP, 2 KBs, 2 Bugs, 5 LAs, 2 ea. 1/2" to 3/4",
hooks, Gear to 2".
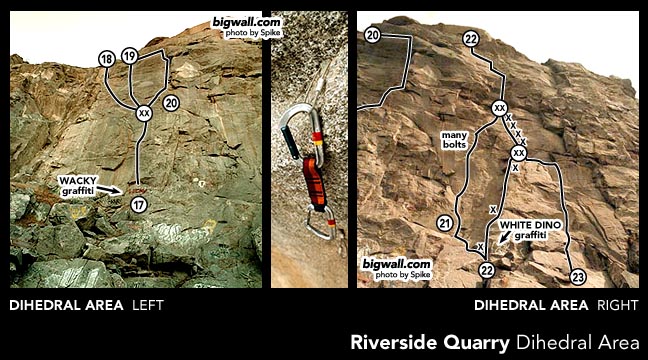
THE DIHEDRAL
Route Descriptions (going left to right)
17) DUNLAP BOLT LADDER (C1)
- Starting at the "Wacky" graffiti, follow six good bolts/rivets
up the face below the obvious dihedral right of the Roof area to a good
ledge. The gear list below is for the last few moves after the bolts. Traverse
left to reach anchors.
- Pro: Black and Green Aliens, .5 Camalot, rivet hangers, biners.
- 18) UNKNOWN (?)
- From the ledge at the top of DUNLAP BOLT LADDER, this route heads
left and ascends a chimney to the summit.
- Pro: Unknown. Do it and give us the beta.
- 19) RIVETS AND BITS (A2)
- From the ledge at the top of DUNLAP BOLT LADDER, go straight to the
summit where you'll find anchors on a sloping ledge. Some bunk rivets and
blown heads.
- Pro: Copperheads, rivet hangers. Probably needs other gear too.
May want a cheat stick.
- 20) THE DIHEDRAL (5.8, A3)
- From the ledge at the top of DUNLAP BOLT LADDER, freeclimb (5.8) up
and right towards the dihedral. Ascend the stellar dihedral passing one
bolt. At the top of the dihedral the rock is very LOOSE. Traverse left along
a thin crack to the sloping ledge that has the top anchors for RIVETS AND
BITS. This is pretty ugly. Alternately, instead of traversing completely
left from the top of the dihedral, continue up when a micro vertical crack
is reached. Upon topping out, walk over to the RIVETS AND BITS anchor.
- Pro: Gear from Aliens (mostly blue and green) to #3 Camalot. Peckers,
RURP, 1-2 ea. #1-#2 KBs, 1 ea. 1/2", 1 ea. 3/4", cam hooks.
- 21) RIVET LADDER (A2)
- Two routes start at a single bolt to the left of the white graffiti
dinosaur, this is the left one. Begin with some large TCUs and Camalot Jr.-sized
pro up an expanding crack to reach the rivet ladder. Four 1/4" buttonheads,
some with fixed cable hangers lead up to some fixed heads. Nine more bolts
get you to the anchor.
- Pro: 1 ea. Yellow and Red Aliens, 1 ea .5 and .75 Camalot, cam
hooks, rivet hangers, big circle heads, long runners.
- 22) A THIN SEAM (A3+)
- Starting at the "dino" graffiti, freeclimb the obvious dihedral
(5.9 R) to a spot just below the first bolt. Smallest Leeper Cam Hook will
get you to the 1/4" bolt. Continue up the thin seam using pins to a
good ledge. Second pitch is a short, 4 bolt ladder which leads into a thin
and loose-looking crack/flake system. Third pitch looks awesome. Guesstimate
rating at A2 at the bottom and A3 at the top.
- Pro for Pitch 1: No nuts, only a couple cams. 1 Pecker, many #1
-#2 KBs, thin LAs, 1 ea. .75 Camalot, wire brush. Pitch 2-3: You're on your
own.
- 23) UNKNOWN (A2)
- This is the route to the right of A THIN SEAM.
- Pro: ?
RIGHT END OF MAIN WALL
Route Descriptions (going left to right). No photo.
- 25) UNKNOWN (A2)
- See RUN AMOK for starting location. This route climbs a series of
curving flakes left of RUN AMOK. Begin with some 3rd class climbing up to
a left curving flake/arch. Follow this up and left, past a bolt. Continue
up a loose, right-facing flake (A2), passing a fixed pin and ending on a
ledge.
- Pro: Unknown.
- 25) RUN AMOK (5.9, A3)
- This 3 pitch route is left of a 5.11a glue-up with 4 bolts near a
Pepper Tree. Easy face climb up to a left facing corner. Climb this corner
(5.6) to a section of thin aid (A3) up to a ledge with 3 bolts. The second
pitch is a left-facing fist crack (5.9) which passes some loose flakes.
Third pitch is a series of bolt protected mantles and finger cracks in blocks
leading to a flared chimney. This chimney ends in an alcove which requires
an improbable-looking mantle with awesome exposure. Caution, many loose
blocks on this route.
- Pro: 1 ea. RURP, 3 KBs, 2 Bugaboos, 6 LAs, several 1/2" and
5/8" angles, 1 ea. Gear from 3/4" to 3 1/2".
END BUTTRESS
Route Descriptions (going left to right). No photo.
A) ARETE (5.11 or A2)
- The sharp arete to a right facing corner on the south face of the
Main Wall (around the corner to the right).
Pro: Quickdraws, hooks (?)
- B) AGONY ARCH (5.11 or A1)
- Difficult overhanging and curving crack to the right of a roof. Fist/OW
or easy aid.
Pro: Gear to 3".
- C) AGONY ARCH A2 VAR:
- At 2/3rds height, take the thin left leaning crack and climb to roof.
Rejoin AGONY ARCH to the top.
- Pro: Gear to 3". Thin pins.
- D) HUMP OR DUMP (5.8)
- Sweet 5.8 finger crack right of AGONY ARCH.
- Pro: Gear to 2".
- E) QUAKE AND SHAKE FLAKES (5.10d)
- Begin up an easy crack to the right of HUMP OR DUMP and face climb
past two bolts via large and partially detatched flakes. Head right after
the last bolt. Be careful not to pull off the flakes on this fun route.
- Pro: Quickdraws.
- F) VALIANT FLAIL TO NO AVAIL (5.11) not shown
- Difficult face climbing past one bolt at midheight. Shares anchor
with QUAKE AND SHAKE FLAKES. Height dependent.
- Pro: Quickdraws.
TOP OF PAGE
MT. RUBIDOUX
Area Description
High quality granite located on a boulder strewn hillside. Probably a better
place to boulder than aid, but there are a few good aid lines.
Directions
91 Freeway, exit 14th Street. Go northwest, passing Pine and Redwood. Turn
left on Glenwood. Parking lot soon obvious near gate. Hike up the trail.
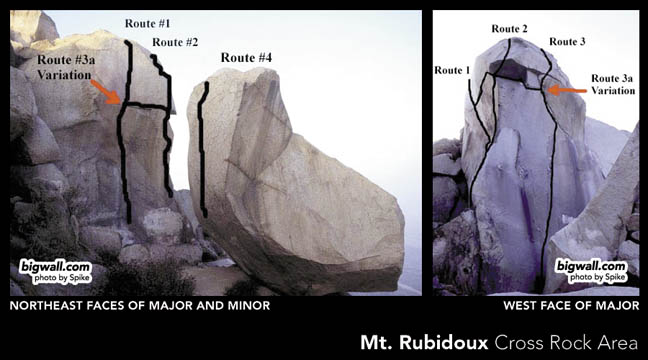
CROSS ROCK AREA
Route Descriptions (beginning at Northeast corner of crag, and going
left to right)
- 1) MAJOR BOLT LADDER (C1)
- Northwest of the summit cross is Major/Cross Rock. Overhanging bolt
ladder on northeast face of Major/Cross Rock.
Pro: Biners.
- 2) MAJOR ARETE (A2)
- Climb the arete between the A MAJOR CONCEPT route and the MAJOR BOLT
LADDER. Begin with a fixed RURP, to a small Leeper cam hook, up to a nut
placement. Then 3 or 4 1/4" bolts (need rivet/keyhole hangers). After
the bolts you enter the roof section
passing four fixed RURPs, a 1/4" bolt and a fixed head. The last couple
moves require a couple small Alien cams.
Pro: Several small Aliens, nuts, 4 rivet hangers, micro Leeper cam hook.
- 3) A MAJOR CONCEPT (5.12a or C2)
- This route ascends a bolt ladder to a left arching flake, then past
a roof on the west face of Major/Cross Rock. Quite fun. It's a free route
so climb hammerless.
Pro: Gear to 1".
- 3a) Variation (A2)
- Climb A MAJOR CONCEPT to below the roof then traverse left around
the arete, following a thin crack.
Pro: Gear to 1", KBs, LAs, RURPs, beaks.
- 4) MINOR BOLT LADDER (C1)
- Directly across from MAJOR BOLT LADDER on south face of large boulder
(MINOR).
Pro: Biners.
THE ISLAND
Route Descriptions (beginning at far left of crag, and going left to
right)
- 5) ON THE ISLAND (A2)
- Southwest corner of the the Island, a formation a hundred yards
down the road from the old "Lower Parking Area." This is where
the hiking trail comes up from the parking lot at the bottom of the hill.
Climb discontinuous cracks to the right of the southwest arete (K.P.'s ARETE).
- 6) HIS PUBES (A3)
- First rock north of K.P.'s ARETE and ON THE ISLAND. This route climbs
the crack on the north face of this rock, just right of the bombay chimney,
HER CRACK, 5.10
BLACK BLOCK
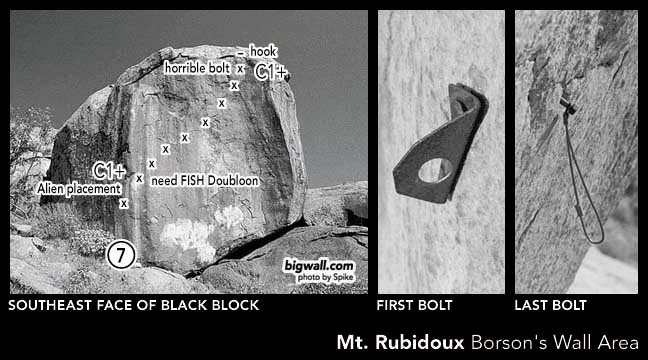
- 7) BLACK BLOCK BOLT LADDER (C1+)
- From the "Lower Parking Area", head northeast to the road
which heads down past Borson's Wall which is on the north side of the road.
This route climbs the southeast face of the large, squarish, black block
directly south of Borson's Wall.
Pro: Small Alien, FISH Doubloon, hooks.
SUPERSTAR SLAB
Route Descriptions (beginning at far left of crag, and going left to
right)
- 8) HANGMAN (A3)
- Continue northeast from the "Upper Parking Lot", past the
Triangle Boulders to the top of Superstar Slab (below and left of
the road). This route climbs the east face of Superstar Slab, left of COATHANGER,
5.12c.
TOP OF PAGE
home | topos &
beta | photos | trip
reports | links